ElastiCache(Redis)の検証用CloudFormationテンプレートを作成しました。
Posted on

はじめに
AWSでredis-cliの確認のためElastiCache(Redis)を作ってみたのですが 接続のためにEC2を作成が必要だったりと思いのほか時間がかかりました。
今後も好きな時にredis-cliを触れる様に、CloudFormationのテンプレート作成しましたので こちらに記載しておきます。
注意として、今回のテンプレートは東京リージョン(ap-northeast-1)での使用しか想定してません。
構築環境
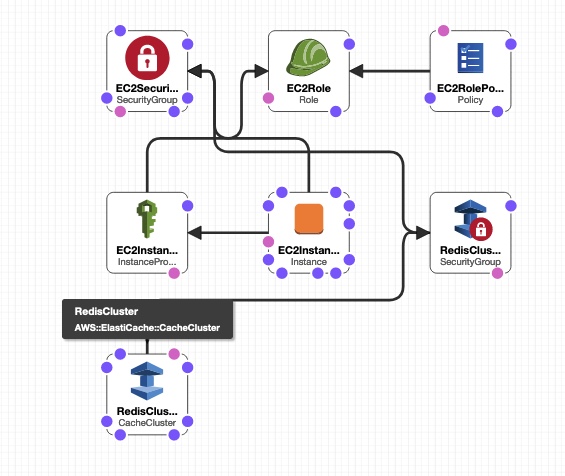
ElastiCache(Redis)と、Redisに接続するためのEC2が存在する環境を作成します。
CloudFormationのデザイナーの画面で見ると以下のようになります。

テンプレートの中身
最初にテンプレートを書いておきます。
AWSTemplateFormatVersion: 2010-09-09
Parameters:
  ClusterNodeType:
    Description: The compute and memory capacity of the nodes in the Redis Cluster
    Type: String
    Default: cache.t2.small
    AllowedValues:
      - cache.t2.micro
      - cache.t2.small
  KeyName:
    Description: Name of an existing EC2 KeyPair to enable SSH access to the web server
    Type: 'AWS::EC2::KeyPair::KeyName'
    ConstraintDescription: must be the name of an existing EC2 KeyPair.
  InstanceType:
    Description: EC2 instance type
    Type: String
    Default: t2.micro
    AllowedValues:
      - t2.nano
      - t2.micro
    ConstraintDescription: must be a valid EC2 instance type.
  SSHLocation:
    Description: The IP address range that can be used to SSH to the EC2 instances
    Type: String
    MinLength: '9'
    MaxLength: '18'
    Default: 0.0.0.0/0
    AllowedPattern: '(\d{1,3})\.(\d{1,3})\.(\d{1,3})\.(\d{1,3})/(\d{1,2})'
    ConstraintDescription: must be a valid IP CIDR range of the form x.x.x.x/x.
Mappings:
  AWSInstanceType2Arch:
    t2.nano:
      Arch: HVM64
    t2.micro:
      Arch: HVM64
  AWSInstanceType2NATArch:
    t2.nano:
      Arch: NATHVM64
    t2.micro:
      Arch: NATHVM64
  AWSRegionArch2AMI:
    ap-northeast-1:
      HVM64: ami-0b2c2a754d5b4da22
  Region2Principal:
    ap-northeast-1:
      EC2Principal: ec2.amazonaws.com
      OpsWorksPrincipal: opsworks.amazonaws.com
Resources:
  RedisCluster:
    Type: 'AWS::ElastiCache::CacheCluster'
    Properties:
      CacheNodeType: !Ref ClusterNodeType
      CacheSecurityGroupNames:
        - !Ref RedisClusterSecurityGroup
      Engine: redis
      NumCacheNodes: '1'
  RedisClusterSecurityGroup:
    Type: 'AWS::ElastiCache::SecurityGroup'
    Properties:
      Description: Lock the cluster down
  RedisClusterSecurityGroupIngress:
    Type: 'AWS::ElastiCache::SecurityGroupIngress'
    Properties:
      CacheSecurityGroupName: !Ref RedisClusterSecurityGroup
      EC2SecurityGroupName: !Ref EC2SecurityGroup
  EC2Role:
    Type: 'AWS::IAM::Role'
    Properties:
      AssumeRolePolicyDocument:
        Statement:
          - Effect: Allow
            Principal:
              Service:
                - !FindInMap
                  - Region2Principal
                  - !Ref 'AWS::Region'
                  - EC2Principal
            Action:
              - 'sts:AssumeRole'
      Path: /
  EC2RolePolicy:
    Type: 'AWS::IAM::Policy'
    Properties:
      PolicyName: EC2Role
      PolicyDocument:
        Statement:
          - Effect: Allow
            Action: 'elasticache:DescribeCacheClusters'
            Resource: '*'
      Roles:
        - !Ref EC2Role
  EC2InstanceProfile:
    Type: 'AWS::IAM::InstanceProfile'
    Properties:
      Path: /
      Roles:
        - !Ref EC2Role
  EC2SecurityGroup:
    Type: 'AWS::EC2::SecurityGroup'
    Properties:
      GroupDescription: Enable HTTP and SSH access
      SecurityGroupIngress:
        - IpProtocol: tcp
          FromPort: '22'
          ToPort: '22'
          CidrIp: !Ref SSHLocation
  EC2Instance:
    Type: 'AWS::EC2::Instance'
    Metadata:
      'AWS::CloudFormation::Init':
        config:
          files:
            /usr/local/bin/install_redis-cli:
              content: !Join
                - ''
                - - |
                    #! /bin/bash
                  - |
                    cd /tmp
                  - |
                    amazon-linux-extras install epel -y
                  - |
                    yum install gcc jemalloc-devel openssl-devel tcl tcl-devel -y
                  - |
                    wget http://download.redis.io/redis-stable.tar.gz
                  - |
                    tar xvzf redis-stable.tar.gz
                  - |
                    cd redis-stable
                  - |
                    make BUILD_TLS=yes && make install
              mode: '000755'
              owner: root
              group: root
            /etc/cfn/cfn-hup.conf:
              content: !Join
                - ''
                - - |
                    [main]
                  - stack=
                  - !Ref 'AWS::StackId'
                  - |+

                  - region=
                  - !Ref 'AWS::Region'
                  - |+

              mode: '000400'
              owner: root
              group: root
            /etc/cfn/hooks.d/cfn-auto-reloader.conf:
              content: !Join
                - ''
                - - |
                    [cfn-auto-reloader-hook]
                  - |
                    triggers=post.update
                  - >
                    path=Resources.EC2Instance.Metadata.AWS::CloudFormation::Init
                  - 'action=/opt/aws/bin/cfn-init -v '
                  - '         --stack '
                  - !Ref 'AWS::StackName'
                  - '         --resource EC2Instance '
                  - '         --region '
                  - !Ref 'AWS::Region'
                  - |+

                  - |
                    runas=root
              mode: '000400'
              owner: root
              group: root
          commands:
            01-install_redis-cli:
              command: /usr/local/bin/install_redis-cli
          services:
            sysvinit:
              httpd:
                enabled: 'true'
                ensureRunning: 'true'
              cfn-hup:
                enabled: 'true'
                ensureRunning: 'true'
                files:
                  - /etc/cfn/cfn-hup.conf
                  - /etc/cfn/hooks.d/cfn-auto-reloader.conf
    Properties:
      ImageId: !FindInMap
        - AWSRegionArch2AMI
        - !Ref 'AWS::Region'
        - !FindInMap
          - AWSInstanceType2Arch
          - !Ref InstanceType
          - Arch
      InstanceType: !Ref InstanceType
      SecurityGroups:
        - !Ref EC2SecurityGroup
      KeyName: !Ref KeyName
      IamInstanceProfile: !Ref EC2InstanceProfile
      UserData: !Base64
        'Fn::Join':
          - ''
          - - |
              #!/bin/bash -xe
            - |
              yum update -y aws-cfn-bootstrap
            - |
              # Setup the PHP sample application
            - '/opt/aws/bin/cfn-init -v '
            - '         --stack '
            - !Ref 'AWS::StackName'
            - '         --resource EC2Instance '
            - '         --region '
            - !Ref 'AWS::Region'
            - |+

            - |
              # Signal the status of cfn-init
            - '/opt/aws/bin/cfn-signal -e $? '
            - '         --stack '
            - !Ref 'AWS::StackName'
            - '         --resource EC2Instance '
            - '         --region '
            - !Ref 'AWS::Region'
            - |+
テンプレートで使用するパラメータの説明
パラメータは4つあります。 それぞれ以下の用途でつかっていますので適宜指定してください。
- ClusterNodeType → ElastiCacheのノードのタイプ
- InstanceType → EC2インスタンスのタイプ
- KeyName → EC2インスタンスに設定するキーペア
- SSHLocation → EC2の接続元のIPアドレス(作業をしている自分のPCのアドレス)
環境構築後の動作確認
EC2でredis-cliが使えるかを確認します。
1) EC2インスタンスに接続する
新しく作成されたEC2にSSHで接続してください。
2) ElastiCacheのエンドポイントを確認する
EC2で以下のコマンドを実行してください。 ElastiCacheのAddressとPortを確認してください。
aws elasticache describe-cache-clusters \
    --show-cache-node-info \
    --region ap-northeast-1 \
    --query "CacheClusters[*].CacheNodes[*].[Endpoint][][]"

出力例)
[
    {
        "Port": 6379,
        "Address": "ec2-re-103twkbyen8sf.s4s7zx.0001.apne1.cache.amazonaws.com"
    }
]
3) redis-cli のコマンドを作成します。
- で確認したAddressとPortを使ってredis-cli のコマンドを作成します。
redis-cli -h <Address> -c -p <Port>

作成例)redis-cli -h ec2-re-103twkbyen8sf.s4s7zx.0001.apne1.cache.amazonaws.com -c -p 6379
4) edis-cli のコマンドを実行してRedisに接続できることを確認します。
3)で作成したコマンドを実行します。
コマンド実行例
$ redis-cli -h ec2-re-103twkbyen8sf.s4s7zx.0001.apne1.cache.amazonaws.com -c -p 6379
ec2-re-103twkbyen8sf.s4s7zx.0001.apne1.cache.amazonaws.com:6379>
5) Redisにデータが格納、取得ができるかを確認する。
Redisに TEST という文字列を格納、取得できるかも確認しておきます。
ec2-re-103twkbyen8sf.s4s7zx.0001.apne1.cache.amazonaws.com:6379> set A TEST
OK
ec2-re-103twkbyen8sf.s4s7zx.0001.apne1.cache.amazonaws.com:6379> get A
"TEST"
ec2-re-103twkbyen8sf.s4s7zx.0001.apne1.cache.amazonaws.com:6379>
まとめ
redis-cliを確認できる環境のテンプレートを作成しました。
テンプレート作成になれておらず、苦労しましたがいい勉強になりました。